
If you want to learn how to use Codex, do not start by memorizing every setting, command, model name, and permission panel.
Start by Building Something.
In this guide, you will use the Codex app to turn an empty folder into a small interactive t-shirt design page called Mine Tee Studio. You will ask Codex to plan the project, create the files, preview the page, improve the interaction, explain the code, save the project context, and lightly initialize Git.
The goal is not to become a senior developer in one sitting.
The goal is to understand the first useful Codex loop: describe, plan, build, preview, improve, explain, and save.
Table of Contents
How to Use Codex to Build Your First Project?
Use this simple workflow for your first Codex project:
- Open the Codex app.
- Select an empty project folder.
- Ask Codex to plan the project before creating files.
- Approve the first build.
- Preview the generated page.
- Ask for one interaction improvement.
- Use a screenshot or visual direction to improve the design.
- Ask Codex to explain the files.
- Save the project with
README.mdand AGENTS.md. - Optionally initialize Git as a checkpoint.
- Move to CLI, IDE, or GitHub only after the app workflow makes sense.
Don’t worry about the terminal. Let us focus on making Codex useful without getting lost.
The Fast Answer: Start With the Codex App
The easiest way to use Codex as a beginner is to start with the Codex app, open a local folder, ask Codex to plan one small project, let it build the first version, preview the result, and improve it through follow-up prompts.
Use the app first because it gives you a visual project workspace. You can work with files, threads, previews, and project context without making the terminal the main character.
Best Codex Starting Path by Workflow
Use the Codex surface that fits how you already like to work.
| Your Workflow | Start Here | Why |
|---|---|---|
| You want the easiest first experience | Codex app | Best for visual project work and guided threads |
| You already use the terminal daily | Codex CLI | Best for local command-line workflows |
| You work inside VS Code, Cursor, or Windsurf | Codex IDE extension | Best for editing beside your code |
| You review work in GitHub | Codex web | Best for repo tasks and pull request workflows |
| You want custom automation later | Codex SDK or API-key workflows | Best after you understand normal Codex usage |
For this guide, start with the Codex app.
CLI, IDE, GitHub, MCP, API-key, and SDK workflows are upgrade paths. They are useful, but they should not block your first build.
What You Will Build in This Guide
You will build Mine Tee Studio, a small interactive t-shirt design page.
It will not be a real Shopify store. It will not process payments. It will not ship t-shirts to your neighbor.
It will be a clean front-end project that shows how Codex can create files, add styling, wire up interaction, explain code, and help you iterate.
By the end, your folder should look like this:
mine-tee-studio/ index.html styles.css script.js README.md AGENTS.md
The page should include:
- a hero section,
- a t-shirt preview area,
- color selector,
- size selector,
- print-style selector,
- price update,
- fake cart counter,
- add-to-cart confirmation,
- clean responsive styling
What Is Codex?
Codex is OpenAI’s coding agent. It can read code, create files, edit projects, run commands, explain unfamiliar code, review changes, and help with coding workflows across the app, terminal, IDE, and cloud.
OpenAI Codex revolves around the word “agent,” because Codex can do more than answer a coding question. It can inspect a folder, create files, edit files, run checks, and respond to follow-up instructions.
That is useful.
It also means you should guide it clearly. Codex is fast, but fast without direction is just chaos wearing sneakers.
Before You Start: Download Codex and Check Access
Before creating the folder, make sure you can actually open Codex.
You need a ChatGPT or OpenAI account with Codex access. Codex is included with ChatGPT Plus, Pro, Business, Edu, and Enterprise plans. OpenAI also lists Free and Go access on the Codex pricing page, but Free and Go access may be limited-time or more limited than paid plans.
That means the safest beginner advice is simple:
- If you already have Plus, Pro, Business, Edu, or Enterprise, sign in and use Codex.
- If you are on Free or Go, check whether Codex is available in your account before starting.
- If you hit a usage limit, Codex may show an option to add credits or upgrade, depending on your plan.
Now download the Codex app.
Use the official Codex download page and choose the right version for your computer:
- macOS Apple Silicon if you use a newer Mac with Apple Silicon.
- macOS Intel if you use an older Intel Mac.
- Windows if you use a Windows PC.
Do not download Codex from random mirrors or unofficial installers. Coding agents already have enough chaos potential. No need to add “mystery download from the internet” to the soup.
| Requirement | Why You Need It |
|---|---|
| ChatGPT or OpenAI account with Codex access | You need access to use the app, CLI, IDE, or web workflow |
| Codex app installed | This guide starts with the desktop app |
| Blank local folder | Codex needs a safe place to create files |
| Browser | You need to preview the generated page |
| Screenshot or reference image | Optional, but useful for the design-improvement step |
| Git installed | Optional at first, useful when you save the first version |
| VS Code, Cursor, or Windsurf | Optional, useful for the IDE extension section |
Use a demo folder for this guide.
Do not start with your production app, client project, live WordPress theme, or anything with sensitive files. Give Codex one clean folder and one clear job.
If you are still comparing vibe coding tools for beginners, treat this guide as the practical test. Do not judge the tool only by the feature list. Open it, build one small thing, preview the result, and see whether the workflow feels clear enough to repeat.
Starter Settings for This Build
Use these simple settings for the first run. Do not over-optimize before you have even built the thing.
| Setting | Use This for the First Build | Why |
|---|---|---|
| Model | Use GPT-5.5 if it appears in your model picker; otherwise use the current default | GPT-5.5 is the current recommended Codex choice when available |
| Reasoning effort | Medium | Good balance for a small interactive page |
| Speed | Standard | Keeps the first run calmer and cheaper than Fast mode |
| Permissions | Default or workspace access | Lets Codex work inside the selected folder |
| Plan mode | On for the first prompt | Helps Codex ask questions and plan before files are created |
Do not use full access for this beginner build.
You are working in an empty folder, so the risk is already low. Still, there is no need to give Codex more freedom than the task needs.
Step 1: Create an Empty Folder for Your Codex Project
Create a new local folder called mine-tee-studio.

Open the Codex app and select that folder as your project.
The folder should be empty.

Why? Codex needs a clear working area. Starting with an empty folder removes confusion and makes the result easy to understand.
Mistake to avoid: Do not open your entire desktop or documents folder in Codex. Give it one folder and one job.
Step 2: Ask Codex to Plan Before It Builds
Before you ask Codex to create files, put it in Plan mode.
Click inside the Codex prompt box. Type: /plan
Select Plan when it appears.
You should now see that Plan mode is active. This tells Codex to think through the task and explain the approach before making changes.
Prompt
I want to build a small interactive t-shirt design page in this empty folder.Project name: Mine Tee StudioBefore creating files, give me a short plan. The page should include: a hero sectiona t-shirt preview areacolor selectorsize selectorprint-style selectorlive price updatefake cart counteradd-to-cart confirmationresponsive StylingRules: Use plain HTML, CSS, and JavaScript.Do not use React. Do not add a backend. Do not use payment processing.Do not add external dependencies. Ask up to 3 questions if you need clarification.Stop after the plan. Do not create files yet.

It tells Codex the goal, the project type, the features, the limits, and the stopping point. It also gives Codex permission to ask questions before building.
Codex should give you a short plan. It may ask questions like:
- What visual style should the page use?
- Should the project use one file or separate HTML, CSS, and JS files?
- Should the design feel playful, premium, minimal, or bold?

Review the Plan Before You Approve It
After Codex returns the plan, read it before clicking anything.
Check whether the plan matches your project:
- It should use plain
index.html,styles.css, andscript.js. - It should avoid React, backend setup, payments, and external dependencies.
- It should include the t-shirt preview, selectors, price update, cart counter, and confirmation message.
- It should explain how you can test the page.
If the plan looks good, choose:
Yes, implement this plan
If the plan feels too large, too complex, or different from what you wanted, choose the other option or tell Codex what to change.
You can say:
Make the plan simpler. Keep only index.html, styles.css, and script.js.Do not add any framework or backend.
Do not approve a plan you do not understand. The point of Plan mode is to pause before Codex starts creating files.
For this guide, do not click Yes, implement this plan yet.
Click Dismiss.
Then turn off Plan mode. You can click the Plan label again, or type /plan again if that is how your app switches modes.
Once the Plan label is gone, you are back in normal build mode.
Step 3: Give Codex the Build Prompt
Before you ask Codex to create files, check the permission setting below the prompt box.
For this beginner project, use:
Default permissions
Default permissions are enough for Mine Tee Studio because Codex only needs to work inside the selected mine-tee-studio folder. In the Codex app, default permissions let Codex read and edit files in the current workspace and run routine local commands. Codex should ask before using the internet or going beyond the workspace boundary.
If Codex asks for permission to create or edit files inside mine-tee-studio, approve it.
Do not switch to Full access for this guide.
Full access is not needed for this small project. It can let Codex work outside the selected project boundary, which is more risk than a beginner demo needs. OpenAI warns that full access is not limited to the project directory and can lead to unintended destructive actions if used carelessly.
Use this simple rule:
Default permissions = good for this guideFull access = skip for now
Paste this build prompt into Codex:
Build the first version now.Create these files: index.html styles.css script.js Use a clean, modern product-page style for a fictional t-shirt design brand called Mine Tee Studio.The page should include:a hero section with a short headline and CTAa t-shirt preview areacolor buttons for at least 4 shirt colorssize buttons for S, M, L, and XL print-style buttons for Classic, Bold, and Limiteda price areaa fake cart counteran Add to Cart buttonA small confirmation message after clicking Add to CartRules: Keep everything front-end only.Use mock product data.Do not add dependencies.Do not create a build system.Make the page work by opening index.html in a browser.Keep the code beginner-readable.After creating the files, explain what each file does in plain English.
It gives Codex enough detail to build something useful, but it does not ask for a full app. That is the sweet spot.
Codex should create these files:
mine-tee-studio/ index.html styles.css script.js
It may also explain the files in the thread.

Step 4: Preview the Page Codex Created
Now preview the page.
Codex can open rendered pages inside the app with its in-app browser, which is useful for local previews and front-end checks. It can also support browser-use workflows when the Browser plugin is enabled. Use the in-app preview if it is available; otherwise, open index.html manually in your normal browser. You can also mention @Browser if your setup supports it.
In this build, Codex created an index.html preview link.
Click Open beside the Mine Tee Studio preview.
You should now see the page inside the Codex browser.
Check these things:
- The page loads.
- The hero section appears.
- The t-shirt preview appears.
- The color, size, and print-style buttons appear.
- The Add to Cart button appears.
- The page looks readable on desktop.
The Codex browser also gives you preview controls. Depending on your app version, you may see controls for reload, page options, visual comments or annotation, and expanding the preview panel.
Use them like this:
- Reload: refresh the page after Codex changes files.
- Menu: open preview options such as zoom, cache, or page controls.
- Expand: make the preview larger when you want to inspect the design.
- Visual comment or annotation: use it when you want to point at a specific part of the design and ask Codex to improve it.
We will use the visual design workflow more deeply in a separate guide on designing with Codex. For now, just confirm that the first page opens and works.
If the page does not open correctly, paste this prompt:
The page does not open correctly.Check the links between index.html, styles.css, and script.js.Explain what is wrong before changing anything.Then make only the smallest fix needed to load the page.
If Codex tells you to open the file manually, open index.html in your browser.
You should see the first version of Mine Tee Studio.

Previewing is the moment where Codex becomes real. You stop reading code and start judging output.
Step 5: Ask Codex to Improve the Interaction
Now make the page more useful.
Prompt
Improve the interaction without changing the project structure.Add or improve:* t-shirt color selection* size selection* print-style selection* live price update* fake cart counter* add-to-cart confirmation messageRules:Keep using plain HTML, CSS, and JavaScript.Do not add React or any dependency.Do not redesign the whole page.Preserve the current layout unless a small change is needed.Keep the code beginner-readable.After editing, explain what changed and how I can test it in the browser.
Why? It turns the page from a static design into a small interactive experience. It also keeps the scope clear.
The page should respond when you click:
- t-shirt colors,
- sizes,
- print styles,
- Add to Cart

You should see visual or text changes after each click.

Codex may add more logic than you need. If the update feels too complex, send this:
This is too complex for a beginner demo.Keep only:* color selector* size selector* print-style selector* price update* cart count* add-to-cart confirmationDo not add extra features.Do not redesign the page.Keep the code beginner-readable.
Step 6: Use a Screenshot to Guide the Design
Now give Codex a visual direction.
Open Google, Dribbble, Behance, Pinterest, or a product page you like, and look for t-shirt product page ideas. Do not look for something to copy. Look for design direction.
You might notice things like:
- cleaner spacing
- stronger product cards
- better button styles
- larger product preview
- better hero layout
- cleaner mobile layout
- more premium colors
Take a screenshot of the style you like.
Before uploading it, avoid showing private details, logos, real customer data, or anything you do not want included in your project. If the screenshot comes from another brand, use it only as a private visual reference. Do not ask Codex to copy the design exactly.
Prompt
I attached a screenshot of a product page style I like.Use it as visual inspiration only.Do not copy:* the exact layout* the logo* the text* the brand assets* the product images* any trademarked elementsImprove Mine Tee Studio so it feels closer to that style:* stronger hero section* better t-shirt preview* cleaner spacing* more premium buttons* better mobile layout* stronger product-card feelKeep the current interaction working.Keep the project structure the same.After editing, explain what changed.

It gives Codex a visual direction without asking it to clone someone else’s work. You are not saying “copy this page.” You are saying “use this as inspiration and improve my own design.”
Codex should improve the design while keeping the same project files and interaction.

Check:
- Did the hero section improve?
- Are the buttons clearer?
- Is spacing cleaner?
- Does the page still work?
- Did Codex preserve the JavaScript interaction?
- Does the design feel original?
If the design improves but the interaction breaks, send this:
Prompt
The design improved, but some interactions stopped working.Compare the current HTML and JavaScript selectors.Fix only the broken interaction.Keep the new design.Do not redesign the page again.

Step 7: Ask Codex to Explain What It Built
Now turn the build into learning.
Prompt
Explain this project like I am new to coding.Break it down into:* what index.html does* what styles.css does* what script.js does* where the t-shirt colors are controlled* where the size buttons are controlled* where the print-style price update happens* where the cart count is updated* what I should edit first if I want to customize the pageUse plain English.Avoid jargon unless you define it.
Why? If Codex builds something and you understand none of it, you have a cool file and a mild dependency problem.
Codex should explain each file in simple language. It should point to the parts of the code that control design, interaction, and content.

This is one of the best ways to use Codex: Make it teach the thing it just created.
Step 8: Ask Codex to Save the Project Context
Now ask Codex to create the project notes.
First, create or update README.md.
Prompt
Create or update README.md so I can understand this project later.Include:* project name: Mine Tee Studio* what the project is* how to open the page* what each file does* what interactions are included* what I should ask Codex next if I want to improve itKeep the README short and beginner-friendly.
Your folder should include:
mine-tee-studio/ index.html styles.css script.js README.md

Now add an AGENTS.md file.
Prompt
Create a simple AGENTS.md file for this project.Use this guidance:Keep code beginner-readable.Do not add frameworks unless I ask.Preserve the current visual style.Explain changes after editing.Keep interactions simple and testable.Do not remove working features unless I ask.If a change could break existing interaction, warn me before editing.After edits, tell me exactly which files changed.Keep the file short.
Why this matters:
README.md helps you remember the project.
AGENTS.md gives Codex reusable project guidance for future sessions.
Final file tree:
mine-tee-studio/ index.html styles.css script.js README.md AGENTS.md

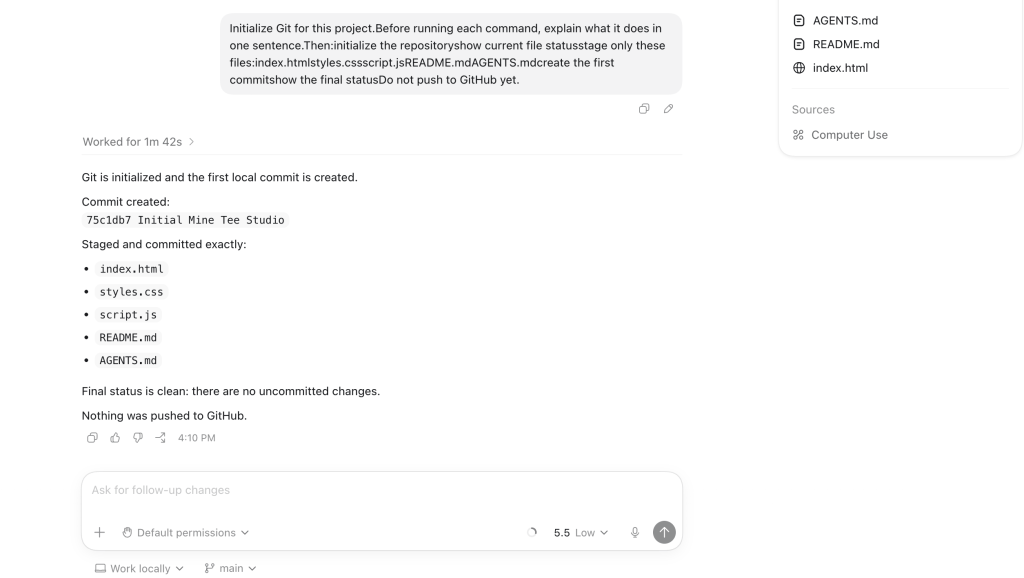
Step 9: Add Light Git So the Project Feels Safe
Now Git can enter the room.
Not as the main character. More like a responsible adult holding a clipboard.
Prompt
Initialize Git for this project.Before running each command, explain what it does in one sentence.Then:* initialize the repository* show current file status* stage only these files: * index.html * styles.css * script.js * README.md * AGENTS.md* create the first commit* show the final statusDo not push to GitHub yet.
If Codex asks for permission to run
git initor create local.gitrepository metadata insidemine-tee-studio, allow it. This only creates local Git tracking files in this demo folder. Do not approve a GitHub push, external network access, or changes outsidemine-tee-studiofor this step.
Codex should use commands like these:
git initgit statusgit add index.html styles.css script.js README.md AGENTS.mdgit commit -m “Create Mine Tee Studio demo”
| Command | Simple Meaning |
|---|---|
git init | Starts Git tracking in this folder |
git status | Shows what changed |
git add index.html styles.css script.js README.md AGENTS.md | Prepares selected files for saving |
git commit -m "Create Mine Tee Studio demo" | Saves this version as a checkpoint |
Expected result: Codex should initialize Git and commit the first version of the project.
If you want to push the project to GitHub later, do it as a separate step after you create the GitHub repository. You can ask Codex for help then, but you do not need GitHub push commands to finish this beginner workflow.
Try Codex CLI Later, Not First
Codex CLI is optional for this beginner workflow.
You already used the Codex app to build, preview, improve, explain, and save the Mine Tee Studio project. That is enough for your first Codex project.
Use Codex CLI later if you like working from Terminal or want Codex closer to local commands.
To install Codex CLI with npm, run:
npm i -g @openai/codex
Then open Terminal inside your project folder:
cd "$HOME/Documents/mine-tee-studio"
Run Codex CLI:
codex
If it opens, you can use it to inspect files, ask questions, or make small edits from Terminal.
If Terminal says:
command not found: codex
Codex CLI is not installed correctly or your terminal cannot find it. Do not get stuck here. You can keep using the Codex app and return to CLI later.
For beginners, the Codex app is the better starting point because it gives you a visual workspace, file previews, browser preview, project context, and review controls.
The CLI is useful, but it should not be the first wall you climb.
Try the Same Project in VS Code, Cursor, or Windsurf
You can also use Codex inside a code editor.
This is useful when you want Codex beside the exact file you are editing. For example, you can open script.js, select the cart logic, and ask Codex to explain or improve that selected code.
For beginners, this should come after the Codex app workflow. The app is easier for your first project because it gives you the project thread, file changes, preview, and review controls in one place.
Use the IDE extension when you are ready to work closer to the code.
To get started:
- Open VS Code, Cursor, or Windsurf.
- Install the Codex extension from the editor’s extension marketplace.
- Open your
mine-tee-studiofolder. - Open the Codex panel from the editor sidebar.
- Sign in with your ChatGPT account or API key.
- Open a file like
script.js,styles.css, orindex.html. - Select the code you want help with.
- Ask Codex to explain, edit, or review that selected code.

The Codex IDE extension works with VS Code, Cursor, Windsurf, and other VS Code-compatible editors. OpenAI also lists downloads for VS Code, Cursor, Windsurf, VS Code Insiders, and JetBrains IDEs. After installation, Codex appears in the editor sidebar, though it may be hidden in collapsed sidebar items in editors like Cursor.
Use Codex Web and GitHub When the Project Is Ready for Review
Use Codex web and GitHub workflows only after your project is inside a GitHub repository.
This is not needed for the first Mine Tee Studio build. You already learned the main Codex app workflow: plan, build, preview, improve, explain, and save context.

GitHub becomes useful when you want reviewable work, branches, commits, pull requests, or code review on a shared repository.

The simple version:
- GitHub: Best for reviewing branches, commits, and pull requests.
- Codex app: Best for your first local project.
- Codex CLI: Best when you like terminal workflows.
- Codex web: Best when your project is already connected to GitHub.
Do not start here if your latest project only exists on your laptop.
Codex web cannot work on local files that were never pushed to GitHub. Push the project to a repository first, then use Codex web or GitHub review features later.
For this beginner guide, stop at the Codex app workflow. Use GitHub when the project becomes real enough to share, review, or continue across devices.
When to Use MCP, Browser Use, Computer Use, API-Key Workflows, and SDK
Most beginners should not start with MCP, computer use, API-key, or SDK workflows.
Start with the app workflow first. Then add extra power only when you have a reason.
| Feature or Surface | Use It When | Beginner Advice |
|---|---|---|
| MCP | Codex needs extra tools or external context | Skip until you hit a real context gap |
| Browser use | Codex needs to inspect or comment on a rendered page | Useful for front-end preview work |
| Computer use | Codex needs to work with supported desktop app interfaces | Keep it narrow and supervised |
| Skills | You repeat the same workflow often | Save for stable workflows |
| API-key workflows | You want usage-based local or automation workflows | Use after you understand normal Codex usage |
| Codex SDK | You want custom Codex-powered automation | Use after you know what you want to automate |
If browser use is enabled, you can ask Codex to use the in-app browser or reference @Browser where supported. If it is not enabled, open index.html manually in your normal browser.
Computer use is more sensitive and availability can depend on platform, region, and setup because it can interact with supported desktop app interfaces. Keep those tasks small and supervised.
Do not unlock every advanced feature just because it exists. That is how a simple t-shirt page becomes a dashboard-powered yak-shaving festival.
What We Did
We used Codex to create a project from an empty folder, planned the build, generated files, previewed the page, improved the interaction, used visual direction, explained the code, saved project context, and initialized Git.
That is the Codex loop:
Give context. Ask for a plan. Build a small version. Preview the result.
Improve it. Ask Codex to explain it. Save the project.
Repeat with more confidence.
This is the useful beginner workflow.
Not “ask Codex to build a billion-dollar app by lunch.”
Not “learn every terminal command first.”
Just a clean loop that gives you control.
Codex works best when it has a clear build task. For planning, research, notes, and daily work outside coding, you may still want a separate stack of the best AI productivity tools. Think of Codex as the build layer, not the whole productivity system.
Common Beginner Mistakes
| Mistake | Why It Hurts | Better Move |
|---|---|---|
| Asking for a full app immediately | Codex has too much room to guess | Start with one visible project |
| Skipping the plan | Codex may build the wrong thing | Ask for a plan before files |
| Using a messy folder | Codex may inspect unrelated files | Start with a clean demo folder |
| Giving full access too early | More risk than needed | Use normal project access first |
| Using high reasoning for tiny tasks | It may burn more usage than needed | Start with medium reasoning |
| Turning on Fast mode for everything | Faster can cost more credits | Use it for small iterations only |
| Not previewing the page | You judge code without seeing output | Always preview visual work |
| Asking Codex to copy a real site | This can create originality issues | Use screenshots as inspiration only |
| Ignoring generated files | You do not learn what happened | Ask Codex to explain each file |
| Starting with MCP or API-key workflows | Too much setup too early | Learn the app workflow first |
The trick is not to make Codex do everything.
The trick is to make Codex do the next clear thing.
Troubleshooting
| Problem | Likely Cause | Fix |
|---|---|---|
| Codex creates only one file | The prompt did not ask for structure | Ask it to split HTML, CSS, and JS |
| The page opens but looks plain | The creative brief was too vague | Add style, mood, colors, and layout direction |
| Buttons do nothing | JavaScript may not be linked correctly | Ask Codex to check script.js and script loading |
| Price does not update | Event handling may be broken | Ask Codex to inspect the print-style logic |
| Design improves but interaction breaks | Codex changed markup without updating JS | Ask it to compare HTML and JS selectors |
| Codex asks no questions | You did not request planning | Ask it to ask up to 3 questions before building |
| Browser preview is unavailable | Browser plugin or in-app browser may not be enabled | Open index.html manually in your browser |
| Git feels confusing | You introduced it too early | Ask Codex to explain each command before running it |
| Codex changes too much | Follow-up prompt was too broad | Ask for one specific improvement |
| You hit Codex usage limits | Model, speed, or task size may affect usage | Check your Codex usage panel and plan details |
When something breaks, do not ask Codex to “fix everything.”
Ask it to inspect one problem.
Small prompts are boring. Boring is how you stay in control.
When Not to Use Codex
Do not use Codex when you cannot review the result.
| Situation | Why to Slow Down |
|---|---|
| The folder contains private files | You may expose files you did not mean to include |
| You do not understand what Codex changed | You cannot safely approve or build on the result |
| The project has secrets or credentials | Sensitive values should not be casually included in coding-agent context |
| You are working directly on production | A mistake can affect live users or live systems |
| The task needs legal, medical, financial, or security certainty | Codex can help draft or inspect, but it does not replace expert review |
| You cannot preview or test the result | You have no reliable way to confirm the change works |
| You are too tired to read the changes | Human review still matters |
Codex can help you move faster.
It does not remove your job as the final human reviewer.
Annoying? Yes. Correct? Also yes.
FAQ
What is Codex?
Codex is OpenAI’s coding agent. It can help read, write, edit, run, explain, and review code across the Codex app, CLI, IDE extension, and cloud workflows.
What is OpenAI Codex used for?
OpenAI Codex is used for coding workflows such as creating files, explaining code, debugging issues, editing projects, reviewing changes, and helping with GitHub-connected development work.
What is a codex?
A codex generally means a bound manuscript or book. In this guide, Codex means OpenAI Codex, the AI coding agent used for software development work.
What is ChatGPT Codex?
ChatGPT Codex is a common way people describe using Codex through ChatGPT-connected plans and Codex surfaces, including the app, CLI, IDE extension, and web workflow.
What is Codex in ChatGPT?
Codex in ChatGPT refers to the coding-agent experience connected to supported ChatGPT accounts. It helps with code, files, repositories, project context, and development tasks.
Is the Codex app better than Codex CLI for beginners?
The Codex app is usually better for beginners because it gives a visual project workspace. Codex CLI is better if you already like terminal-first workflows.
How do you use Codex CLI?
Install Codex CLI with npm i -g @openai/codex, open a terminal inside your project folder, run codex, and start with a small read-only inspection prompt.
How do you use Codex in VS Code?
Install the Codex IDE extension, open your project in VS Code or a supported editor, select a file or code block, and ask Codex to explain or improve it.
Can Codex work with GitHub?
Codex can work with GitHub through Codex web and cloud workflows. Use this after your project is pushed to a repository and ready for branch or pull request review.
Is Codex CLI the same as GitHub Codex?
No. Codex CLI runs locally in your terminal. Codex web works with GitHub-connected cloud workflows. They can support related projects, but they are different surfaces.
What does Codex CLI do?
Codex CLI runs Codex from your terminal. It can inspect your repository, edit files, and run commands inside the selected project directory.
Does Codex have an API?
Codex supports API-key workflows and Codex SDK paths for developers who want custom automation. Beginners should start with the Codex app before moving into API-key or SDK workflows.
Where can I find the Codex download?
Use the official Codex app page for the desktop app and the official Codex CLI docs for terminal setup. Avoid random mirrors or unofficial installers.
Can Codex build a full app?
Codex can help build larger apps, but beginners should start with a small visible project. Build one page, understand it, then add complexity in controlled steps.